
Wow! We are on to block six already!
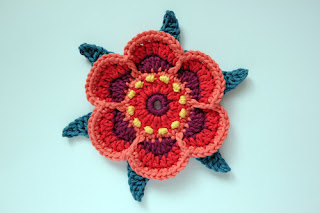
I have called the block featured in this pattern release 'Ring of Roses'. This is the very first block I designed for the blanket and it was the catalyst for the whole design. I remember being really excited when I worked out how to make the 2 tone leaves behind the flower and then managed to get the cream and yellow buds to sit nicely behind too! I hope you will enjoy making these pieces as much as I enjoyed designing them - especially as you need to make 6 of them!
I felt that flowers (and roses in particular) should make the centrepiece of the blanket. Roses feature in Frida Kahlo's work from time to time, but she often wore them in her hair or as part of her costumes.


If you have already worked the previous blocks I think you will find this block pretty straight forward. The leaves are made in a slightly different way to those on Block Five (Heart Rose), but other than that I think the block uses techniques that you have probably already mastered.
Below I have pasted copies of the step by step images for this block:


I really hope you will enjoy making this motif. Don't forget there is bound to be lots of chat and discussion about it on the various Facebook groups - these are easy to find via the Stylecraft page.
If you want to keep up to date with my design work and the events we have coming up over the next few months you can join our mailing list by submitting a form via our Facebook page or via the homepage of our web site.
If you haven't done so already it would be really great if you could spare 5 minutes to visit the Let's Knit knitting and crochet award page by following the link at the top of the right hand side bar. If you would like to vote for me or any of the other amazing knit & crochet designers, authors, makers or sellers you can follow the link to complete an online form and by doing so could also be in with the chance of winning a luxury spa break!
Have a good day!
Janie x
I have called the block featured in this pattern release 'Ring of Roses'. This is the very first block I designed for the blanket and it was the catalyst for the whole design. I remember being really excited when I worked out how to make the 2 tone leaves behind the flower and then managed to get the cream and yellow buds to sit nicely behind too! I hope you will enjoy making these pieces as much as I enjoyed designing them - especially as you need to make 6 of them!
I felt that flowers (and roses in particular) should make the centrepiece of the blanket. Roses feature in Frida Kahlo's work from time to time, but she often wore them in her hair or as part of her costumes.


If you have already worked the previous blocks I think you will find this block pretty straight forward. The leaves are made in a slightly different way to those on Block Five (Heart Rose), but other than that I think the block uses techniques that you have probably already mastered.
Below I have pasted copies of the step by step images for this block:


This sounds obvious, but do make sure you have 6 petals at this point - it is surprising how many times I have carried on happily crocheting only to find I have the wrong number!

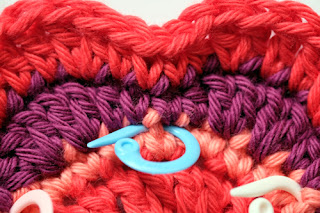
On Round 5 you are asked to work a treble crochet (US double crochet) around the post of a marked stitch. This gives the flower shape a really good definition. Use markers to indicate the stitches you need to work around - again, check you have 6!


Once the main part of the flower is complete you can choose whether or not you wish to add in some sewn bullion stitches to the centre of the flower:


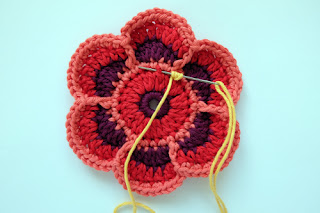
The leaves are made in 2 stages as the reverse side of the work over the following 2 rounds. The image below shows the stitch you need to work into at the beginning of Round 6:


When working Round 7 you need to find the turning chain at the tip of the leaf made on the previous round:


On Round 7 a chain space is made between the leaves - this is used on the subsequent round to make the base of the small flower buds that sit behind the rose.


I really love the rose motif at this point - it would make such a lovely corsage or fascinator don't you think?

Working with the black yarn on the next few rounds can be hard work. If you struggle to see the stitches, avoid working in poor light (in the evening for example). You could try working closer to the window or even get yourself a day light bulb. Working with a light coloured sheet on your lap or at a table with a light coloured cloth could also help.


I really hope you will enjoy making this motif. Don't forget there is bound to be lots of chat and discussion about it on the various Facebook groups - these are easy to find via the Stylecraft page.
If you want to keep up to date with my design work and the events we have coming up over the next few months you can join our mailing list by submitting a form via our Facebook page or via the homepage of our web site.
If you haven't done so already it would be really great if you could spare 5 minutes to visit the Let's Knit knitting and crochet award page by following the link at the top of the right hand side bar. If you would like to vote for me or any of the other amazing knit & crochet designers, authors, makers or sellers you can follow the link to complete an online form and by doing so could also be in with the chance of winning a luxury spa break!
Have a good day!
Janie x